L3akCTF - Pwn - Safe gets
Emojis don’t count as bytes… until they do.
Challenge description
I think I found a way to make gets safe.
Find the flag.
By: White
Flag : L3AK{6375_15_4pp4r3n7ly_n3v3r_54f3}
Ressources
For this challenge, we are given a .zip archive containing a repository with two main files:
chall: an ELF binary we are expected to exploit.wrapper.py: as its name suggests, a Python script that acts as a wrapper to execute the binary.
Tools
For this challenge, I will rely heavily on gdb to analyze the binary’s execution flow. For exploit development, I’ll use the well-known pwntools library, a powerful toolkit that greatly simplifies exploit scripting.
Other than that, we’ll mostly rely on our brain and pwn knowledge. Fortunately, I’ll explain each step in detail so anyone can follow along and learn from this challenge.
Walkthrough
Initial Analysis
Let’s begin with a quick look at wrapper.py:
1
2
3
4
5
6
7
8
9
10
11
12
13
14
15
16
17
18
19
20
21
22
23
24
25
26
27
28
29
30
31
32
33
34
35
36
37
38
39
40
41
42
import subprocess
import sys

BINARY = "./chall"
MAX_LEN = 0xff

# Get input from user
payload = input(f"Enter your input (max {MAX_LEN} bytes): ")
if len(payload) > MAX_LEN:
    print("[-] Input too long!")
    sys.exit(1)

# Start the binary with pipes
proc = subprocess.Popen(
    [BINARY],
    stdin=subprocess.PIPE,
    stdout=sys.stdout,
    stderr=subprocess.PIPE
)

try:
    # Send initial payload
    proc.stdin.write(payload.encode() + b'\n')
    proc.stdin.flush()

    # Interactive loop
    while True:
        line = sys.stdin.readline()
        if not line:
            break
        if proc.poll() is not None:
            print("[+] Process has exited.")
            break
        proc.stdin.write(line.encode('latin1'))
        proc.stdin.flush()
except (KeyboardInterrupt, BrokenPipeError):
    print("[+] Exiting.")
finally:
    try:
        proc.terminate()
    except Exception:
        pass
Here’s what the wrapper does:
- Launches a subprocess running the
./challbinary. - Prompts the user for input.
- Checks that the user input length is less than a defined
MAX_LEN, which is set to255(0xFF). - Forwards the input to the
./challprocess. - Closes the process and exits.
As expected, the wrapper serves primarily to enforce a size constraint on the user input before sending it to the actual binary. The core logic of the challenge lies in the ./chall binary.
To start analyzing the binary, we first use the file command to identify its type and then checksec to assess its security mitigations.
1
2
3
4
5
file chall

chall: ELF 64-bit LSB executable, x86-64, version 1 (SYSV), dynamically linked, interprete
r /lib64/ld-linux-x86-64.so.2, BuildID[sha1]=069a626803609321a7ec8d5c1d5dd218b3f7939a, for GNU
/Linux 3.2.0, not stripped
This output confirms that chall is a 64-bit dynamically linked ELF executable. The most important detail here is that the binary is not stripped, meaning it retains its symbol table — function and variable names haven’t been removed. This is great news for rev and debugging, as we’ll be able to read function names directly in tools like gdb.
Next, we run checksec to examine the binary’s security features:
1
2
3
4
checksec --file=chall

RELRO           STACK CANARY      NX          PIE     RPATH     RUNPATH     Symbols ...
Partial RELFO   No canary found   NX enabled  No PIE  No RPATH  No RUNPATH  38 symbols ...
Let’s break this down:
- RELRO (Relocation Read-Only): Only partially enabled, so the GOT (Global Offset Table) is still writable.
- Stack Canary: Not present, meaning there’s no protection against simple stack-based buffer overflows.
- NX (No-eXecute): Enabled — this prevents execution on the stack, but not a blocker for Return-Oriented Programming (ROP).
- PIE (Position Independent Executable): Disabled — this means the binary is loaded at a fixed address, which is great for exploitation as we can hardcode addresses without needing to leak memory.
In short, we’re dealing with a relatively unprotected binary: no stack canary, no PIE. This makes it a good candidate for classic buffer overflow. In a future article, I might delve deeper into each of these security mitigations and their impact on binary exploitation.
Dynamic Analysis
Now that we’ve understood the general structure of the challenge, it’s time to see how the chall binary behaves at runtime. For that, let’s simply execute it and observe its behavior:
From this quick test, it becomes clear that the program reverses the input string: the first character becomes the last, the second becomes the second-to-last, and so on.
Static analysis
Time to bring out the heavy tools. Let’s load the binary into Ghidra and explore its code. From the function list, two functions stand out:
main(): the entry point containing the core logic.win(): a suspiciously named function that likely holds the key to capturing the flag.
win()
Let’s start with win() since it’s short and easy to analyze

This function doesn’t do much: it simply spawns a shell by executing /bin/sh. That’s a strong indication that this function is our target — if we manage to redirect execution flow to win(), we’ll likely be able to retrieve the flag manually from a shell session.
main()
Now let’s focus on the main() function, which implements the input handling and reversal behavior we observed during dynamic analysis.
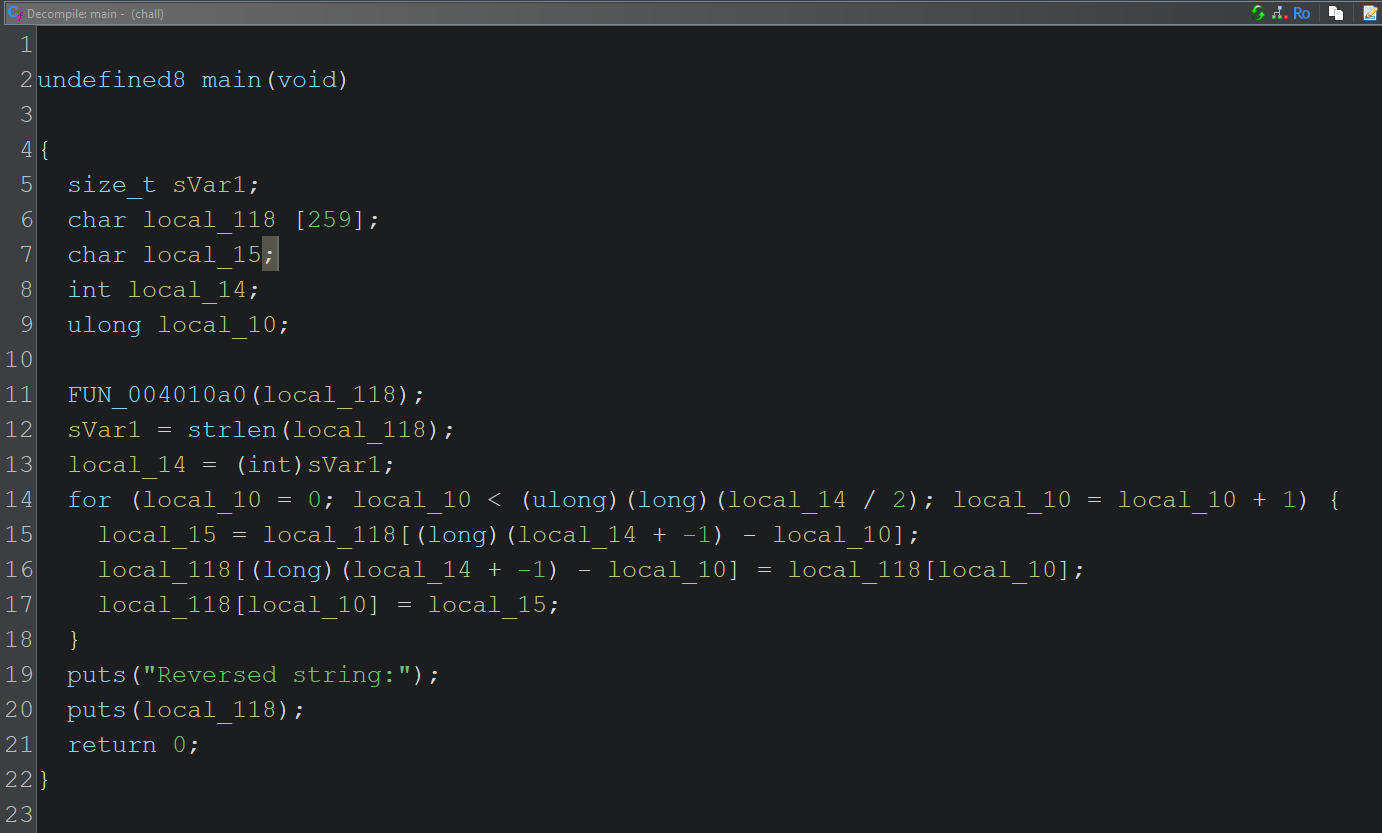
We can already recognize some patterns here: input is read into a variable, its length is computed, and a for loop performs processing — which we now suspect is the string reversal.
Based on this observation, it’s safe to assume that local_118 (Ghidra’s default naming for local variables) is the user-provided input, and the reversal happens inside the loop.
Let’s clean up the decompiled code to better understand the logic:
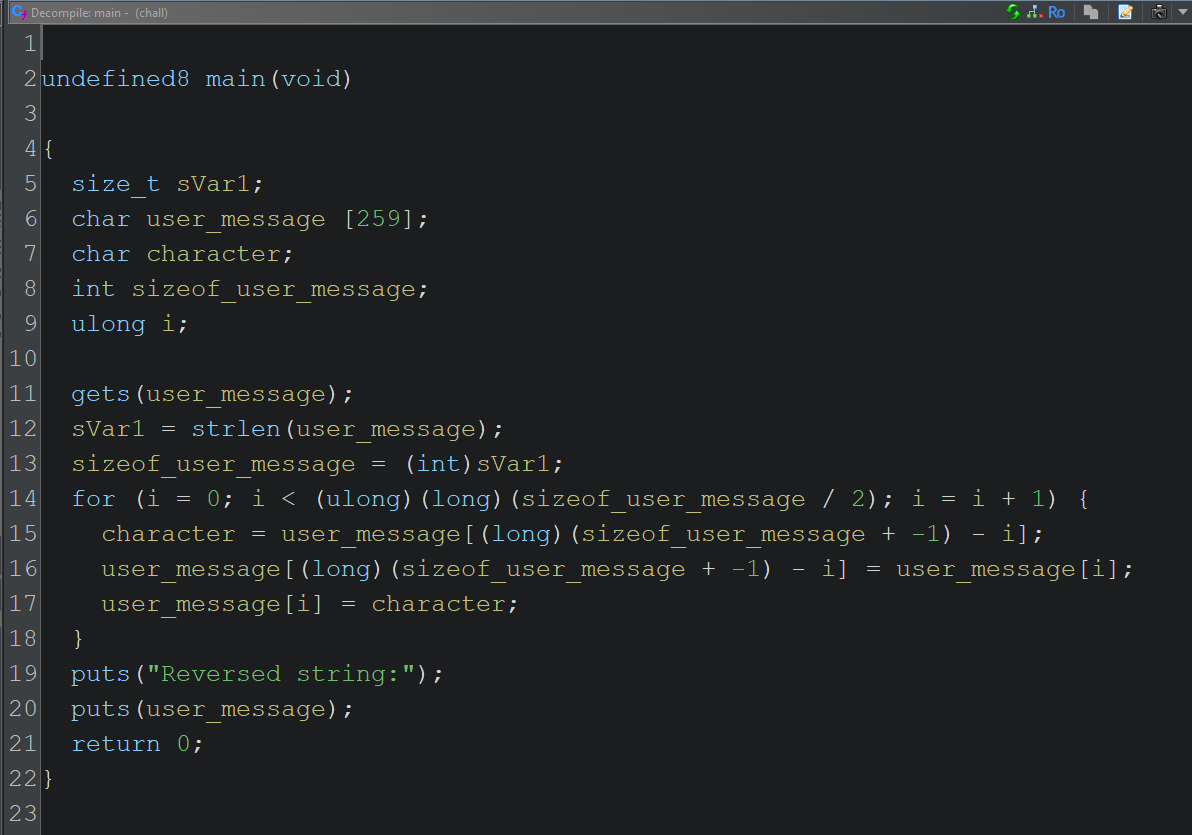
You see it, I saw it, we all saw it: the infamous gets() function. The binary is literally asking us to exploit it. gets() is notoriously unsafe: it reads user input into a buffer without checking if the input fits, leading directly to buffer overflows.
What’s wrong with gets() ?
The gets() function reads input from stdin into a buffer, but doesn’t check the size of the buffer. That means if the user sends more data than the buffer can hold, the function will keep writing — overwriting adjacent variables or even the return address of the function on the stack.
This vulnerability is called a buffer overflow, and it’s one of the most classic exploitation vectors in binary exploitation. I’m planning to publish a dedicated article on this topic soon, so stay tuned!
So we want to be able to overwrite the return adress that is placed at the begin of the stack to write in it the adresse of the win() so that we jump to it instead. To do so, we need to overwrite the complete buffer allocate for the user_message AND the space for RBP.
What we need to do is clear: overwrite the return address stored on the stack so that it points to the win() function. This means we must:
- Overflow the buffer allocated for the user input.
- Overwrite the saved base pointer (
RBP). - Overwrite the saved return address with the address of
win().
Let’s figure out how many bytes we need to reach the return address. To get the size of user_message we can look at the assembly code from Ghidra:
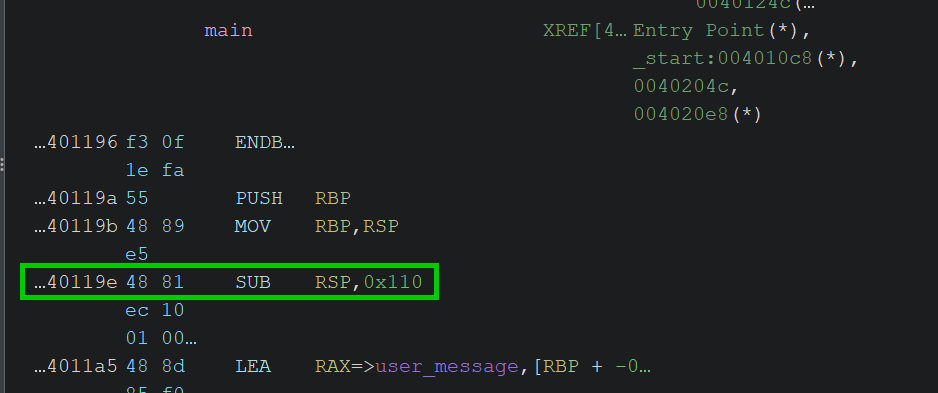
What does this assembly tell us ?
One line in particular is important:
1
sub    rsp, 0x110
This instruction subtracts 0x110 (272 in decimal) from the stack pointer (RSP), effectively allocating 272 bytes on the stack for local variables.
Why are we subtracting instead of adding? Because of how the stack works: its current top is tracked by the RSP register, and the stack grows downward in memory — from higher addresses to lower ones. So, subtracting from RSP effectively allocates more space on the stack by moving the stack pointer to a lower memory address.
This memory reservation likely corresponds to the buffer used for storing user input. So in C, this would be equivalent to:
1
char user_message[259];  // 259 bytes
Why 272 and not 259? Because compilers often add padding to maintain stack alignment — typically a multiple of 16 bytes — which explains the discrepancy. The remaining 13 bytes are likely padding for alignment purposes.
BUT! Remember the wrapper?
Earlier we saw that wrapper.py limits user input to a maximum length of 255 bytes, enforced before the binary even receives it. But we just determined that we need to send at least 280 bytes to reach the return address.
So here’s the real challenge: how can we bypass the Python wrapper’s input length restriction to send a longer payload and exploit the buffer overflow?
Python emoji attack 🗿
There’s something quite amusing (and exploitable) about how Python’s len() function works with emojis. You might expect it to count the number of bytes an emoji uses — but instead, it counts the number of grapheme clusters (visual characters).
So, the emoji “🗿” is counted as 1 character by len(), even though it’s actually 4 bytes when encoded in UTF-8.
Let’s demonstrate that with a small Python snippet:
1
2
3
4
user_message = input("Enter your message: ")

print("Size from len function: ", len(user_message))
print("Size after encode:", len(user_message.encode()))
As shown in the demo, len() returns 1, while len(...encode()) gives 4 — the true size in bytes. And now the fun part: we can use this quirk to bypass the length check in wrapper.py, and still send enough bytes to trigger a buffer overflow.
Here’s the idea:
1
2
3
# 70 * 4 = 280 bytes, exactly what we need.

payload = "🗿"*70 # + ret_address + win_address (still to be determined)
This bypasses the len(input) < 255 check in the Python wrapper while still sending 280 bytes to the underlying binary. Perfect!
BUT (yes, another one): remember that the binary reverses our input before using it. That’s a huge problem.
If we send a nicely crafted payload with a fake return address followed by the address of the win() function, the binary will reverse it — and our exploit will be completely messed up. Instead of jumping to win(), it will jump to garbage. Unless…
Exploiting strlen()
Here’s the clever trick. Let’s take a closer look at how the reversing is done:
- The program first calls
strlen()on the user input. - It uses the result to iterate over the input in a for loop, and reverse it.
So, what if strlen() returns 0? Then the loop won’t run — and the input won’t be reversed. Which means… we can send a payload without it being reversed and corrupted.
Now, how does strlen() work? It simply walks through memory, counting bytes until it encounters a null byte (\x00), which it treats as the end of the string. So if we start our payload with a null byte, strlen() will return 0 — and the reversing loop will be skipped entirely. We can craft the payload like this:
1
2
3
4
5
# Total needed: 280 bytes
# 🗿 = 4 bytes, so 69 emojis = 276 bytes
# Add 1 null byte + 3 padding bytes ('A') = 280

payload = b"\x00" + "🗿"*69 + b"A"*3 # + ret_adress + win_adress
By placing the null byte at the beginning, the length reported by strlen() becomes 0 — so no reversal occurs. The rest of the payload (emojis + padding + addresses) remains untouched in memory.
Finding the adress of win()
We’re almost there. All we need now are two key addresses:
- The address of the
win()function (our target). - The address of a
retinstruction (used for alignment).
Since the binary is not stripped and PIE is disabled, addresses remain constant, and we can easily retrieve them using gdb.
Let’s start by getting the address of win():
So win() is at 0x401262. Next, we search for a ret instruction. These are usually found at the end of functions — so let’s check inside main():
We found a ret at 0x401261. Now that we have both addresses, we’re ready to build the final payload and write the exploit script using pwntools.
Why do we need a ret ?
When using gadgets like win(), depending on the system and calling convention, we may need to adjust the stack for proper alignment. In 64-bit Linux, the ret gadget is often used to align the stack correctly before jumping to a function.
Final Exploit
1
2
3
4
5
6
7
8
9
10
11
12
13
14
15
16
17
from pwn import *

# Local version
# elf = context.binary = ELF("./chall")
# p = process()

# Remote version
p = remote("34.45.81.67", 16002)
p.recvuntil(b't (max 255 bytes):')

ret_address = p64(0x401261)
win_address = p64(0x401262)

payload = b"\x00" + "🗿".encode() * 69 + b"A" * 3 + ret_address + win_address

p.sendline(payload)
p.interactive()
When you launch the exploit, a shell is spawned. From there, you can simply list the contents of the directory and retrieve the flag file.
Conclusion
This was by far the longest writeup I’ve written. I know most writeups tend to be much shorter and go straight to the point, but I’ve often found myself lost when reading writeups that skip over key explanations. That’s why I chose to over-explain things — so even someone new to binary exploitation or CTFs can follow along and learn something.
I was also surprised by how hard it is to write a good pwn writeup. When you’re trying to explain what’s going on, it’s easy to get sidetracked into deep technical rabbit holes. Finding the balance between accessibility and technical depth is definitely a challenge.
Even though I didn’t solve this challenge during the actual CTF, I spent quite some time afterwards understanding it in detail — and used it as a great excuse to dive deeper into tools like gdb, pwntools, and x86-64 internals.
This was a really enjoyable challenge, and I look forward to tackling more like it soon.
Thanks for reading — hope you enjoyed the writeup. See you in the next one!
emree1