IrisCTF2025 - Forensics - Windy Day
When memory betrays you..
Challenge description
I have really bad memory. I was analyzing something but then lost track of an important note…
Find the flag.
By: skat
Flag : irisctf{i_am_an_idiot_with_bad_memory}
Ressources
For this challenge, we need to analyze a memory capture. To achieve this, we will use:
Volatility3: an advanced memory forensic framework that allows us to extract artifacts, analyze processes, and detect anomalies in RAM dumps.Custom forensic tools: I will also leverage some scripts I have developed to automate specific analysis tasks and extract relevant data more efficiently.
Walkthrough
I wasn’t able to solve this challenge during the irisCTF 2025 event. I installed Volatility3 and ran PsScan on the memory capture, but I struggled to determine the next steps. After reviewing some write-ups, I noticed that most solutions followed the same approach, rushing directly to the flag without a structured forensic methodology.
However, I wanted to apply a real-world forensic investigation methodology, rather than just extracting the flag as quickly as possible. This write-up is highly detailed and documents the structured approach I developed to solve this challenge.
Initial Analysis
Since we are dealing with a memory capture, our first instinct is to use Volatility3, a powerful framework that provides various plugins for memory analysis.
The first step in any forensic memory analysis is to determine the operating system. This is crucial because different OS require different Volatility profiles and plugins. While searching for a dedicated plugin to detect the OS, I didn’t find any straightforward solution.
The most practical approach is to run the PsList module and observe whether it produces a valid output. Since most memory captures in CTF challenges come from Windows systems, let’s start there.
1
vol.py -f memdup.mem windows.pslist
Output :
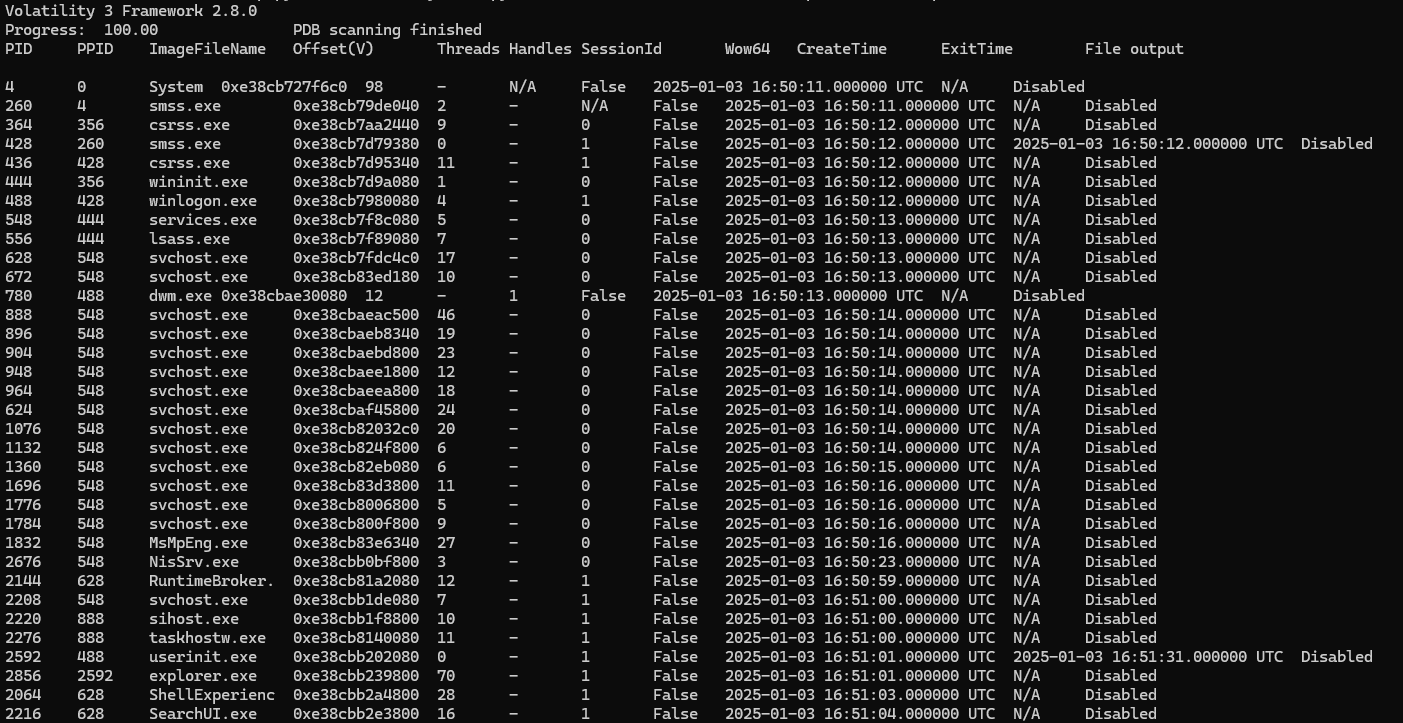
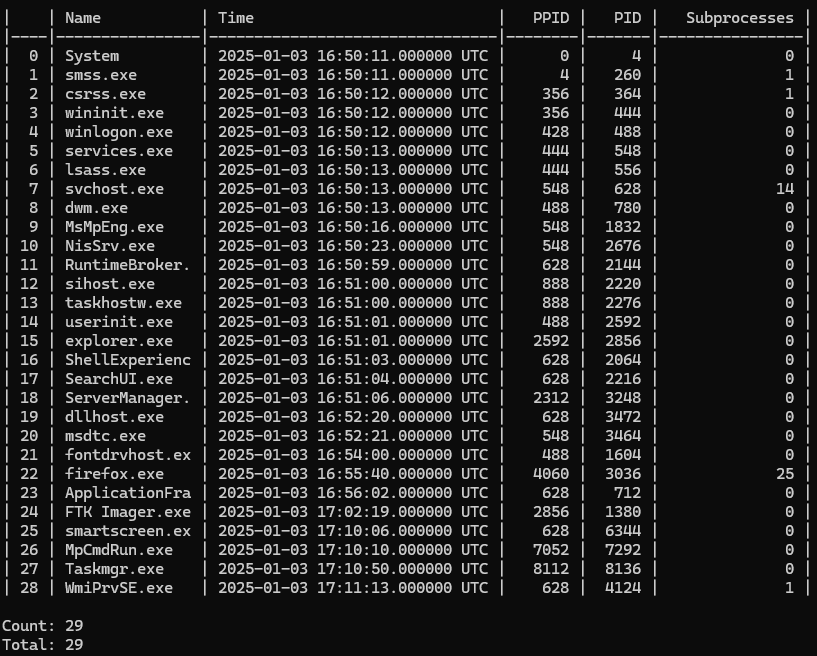
After running PsList, we successfully identified the OS and obtained a structured list of running processes. To analyze this data more effectively, I extracted the PsList output as a CSV file and processed it using my custom PsList Summarizer. This tool helps filter and organize the process list, making it easier to spot anomalies.
1
2
vol.py -r csv -f memdump.mem windows.pslist > pslist_result.csv
vol_ps_summarizer.py pslist_result.csv
Output :
The initial output contains a lot of noise, so let’s clean it up by removing irrelevant processes and ordering the results for better readability.
1
vol_ps_summary.py pslist_result.csv --filter "subp > 0" -o subp --inv_order
Output :
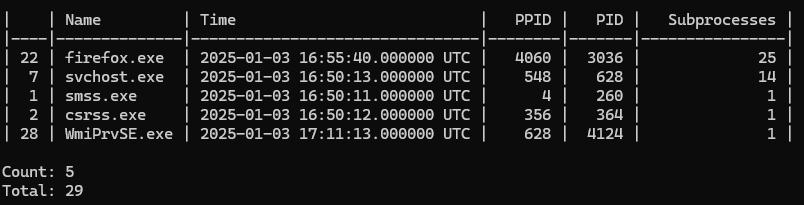
We have a large number of firefox.exe and svchost.exe processes running in memory. Let’s focus ont the firefox.exe processes.
Investigating Firefox Processes
To begin our analysis, we need to dump the memory of the firefox.exe processes. From our previous summary, we identified that the root firefox.exe process has PID 3026. We will use this information with Volatility3 to extract its memory dump.
To achieve this, we will use the windows.memmap plugin, which allows us to retrieve the memory mappings of the process, potentially revealing useful artifacts.
1
vol.py -f medump.mem windows.memmap --pid 3036 --dump
At this point, I searched for a plugin capable of extracting files from the dumped process memory, but I couldn’t find anything directly applicable. Unlike traditional disk forensics, memory forensics is much more chaotic—there are no clear structures like file tables, making analysis significantly more complex.
A common technique used by forensic analysts is to run the strings command on the memory dump. This extracts all readable ASCII and Unicode strings, which can then be manually analyzed for useful information.
1
strings pid.3036.dmp > firefox_strings.txt
Given that the raw strings output contains nearly 7 million lines, manually reviewing them is impractical. Instead, we can leverage a key piece of knowledge: in CTF challenges, flags usually follow a specific format. In this case, all flags start with irisctf. Using this information, we can refine our search and extract only relevant strings, significantly reducing the amount of data to analyze.
Searching for Relevant Keywords
Now that we know the flag follows the format irisctf{...}, the next step is to locate it within the process memory dump.
Most write-ups I found online go straight to the solution, suggesting that we search for the Base64-encoded version of irisctf inside the extracted strings. But why Base64 ?
Since we are analyzing a Firefox process dump, it’s likely that we will encounter URLs stored in memory. Many web services and applications encode data using Base64, especially for parameters passed within URLs or stored in browser memory. Let’s encode our keyword in Base64.
1
2
3
4
5
6
[Convert]::ToBase64String([Text.Encoding]::UTF8.GetBytes("irisctf"))

# Result
aXJpc2N0Zg==

findstr aXJpc2N0 firefox_strings.txt > matches.txt
After running the search, we found 955 matches in total. At this point, we can manually analyze the output to identify valid Base64-encoded values and extract the flag. Or we can use a script to filter out only valid Base64 strings, decode them, and check for any readable text that resembles a flag.
Optimizing My Workflow
The methodology we used earlier is far from flawless—assuming the flag was encoded in Base64 was a reasonable guess, but it wasn’t a certainty. Instead of relying on a single assumption, we can define a more systematic and precise approach.
Since we know part of the flag format, we can leverage this information to generate different encoded representations and search for all of them at once. For example, we can generate Base64-encoded or Hexadecimal-encoded versions of the keyword.
To automate this, I wrote a script that generates these variants and searches for them in the extracted strings. You can find it on my GitHub for more details.
Using this method, I searched for occurrences of irisctf and its encoded variants in Base64, hexadecimal, and Caesar cipher. These encodings are the most common ones I’ve encountered in CTF challenges, but I plan to expand the list as I identify new patterns in future competitions.
1
keyword_search.py firefox_strings.txt -k irisctf -v user, b64, hex, cesar --order count --inv_order --quiet --remove_double
Output :
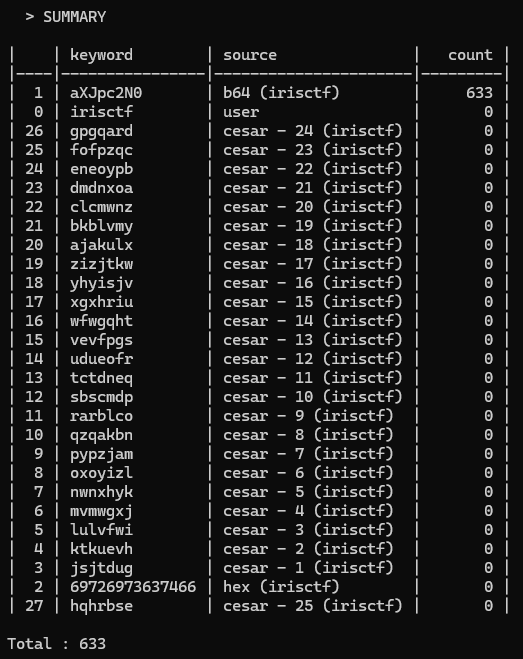
The search returned 633 matches for the Base64-encoded version of irisctf, confirming that we are indeed dealing with Base64-encoded data. However, this is still too many results to analyze manually (for me at least).
Refining Search Results
Looking at the output, I noticed that some strings are substrings of longer ones. For example:
1
2
3
4
5
6
7
[...]
aXJpc2N0ZntpX2FtX2FuX21kaW90X3dpdGhfYmFkX211bW9yeX0=
aXJpc2N0ZntpX2FtX2FuX21kaW90X3dpdGhfYmFkX211
[...]
client=firefox-b-d&q=aXJpc2N0
client=firefox-b-d&q=aXJpc2N0Z
client=firefox-b-d&q=aXJpc2N0Zn
Since longer strings already contain the information of the shorter ones, we only need to keep the longest variants. To automate this filtering, I wrote another script, which you can also find on my GitHub.
1
2
3
4
5
6
longest.py firefox_strings.txt -k irisctf -v user, b64, hex, cesar --order count --inv_order --quiet --remove_double

# Result
Count : 237
Removed : 396
Total : 633
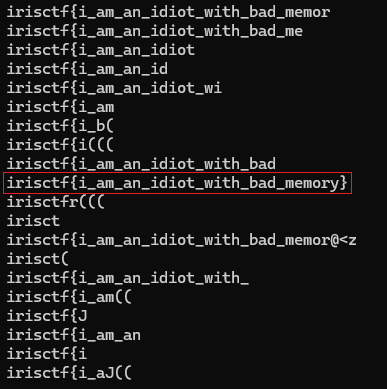
After applying this optimization, we reduced the number of relevant lines to 237 without losing any valuable data. At this point, we could manually inspect these lines to identify a valid Base64-encoded flag.
1
2
3
4
https://www.google.com/search?client=firefox-b-d&q=aXJpc2N0ZntpX2FtX2FuX2lkaW90X3dpdGhfYmFkX21lbW9yeX0%3D
"client=firefox&channel=fen&q=aXJpc2N0ZntpX2FtX2FuX2lkaW90X3dpdGhfYmFkX21lbW9yeX0Older versions of Firefox may start to have problems on January 14, 2025."
aXJpc2N0ZntpX2FtX2FuX2lkaW90X3dpdGhfYmFkX21lbW9yeX0
...
Identifying Base64 Matches
If we don’t want to search manually through the results, we can write a script that automatically looks for all valid Base64 strings starting with irisctf (or its Base64 equivalent, aXJpc2N0). You can find this script on my GitHub.
1
b64.py filtered.csv aXJpc2
Output :
Conclusion
And that’s how we obtained the flag: irisctf{i_am_an_idiot_with_bad_memory} from the memory capture ! This was my first challenge dealing with a memory capture. As I mentioned earlier, I wasn’t able to complete it during the event. I had installed Volatility3, but at the time, I wasn’t sure where to start or what to look for.
By revisiting the challenge after the event and following write-ups I found online, I gained a lot of knowledge. I also developed small scripts to automate certain tasks, which significantly improved my workflow.
I’m confident these scripts will be useful in future CTFs and will help me build a more structured and methodical approach for forensic analysis moving forward. The most fascinating part of this challenge was exploiting the knowledge of the flag’s structure to base our keyword search around that.
Thank you for reading my write-up! I hope it was clear and helpful. See you in the next challenge!
emree1